Sep 15, 2013

Pie Crust Recipe and Tips


Making a pie can be intimidating, but with a little practice you can do it!  One of my more crazy ideas was to teach the 12 and 13 year old girls in my church how to make a pie crust.  But I'm proud, and relieved to say it was a success!  Each girl went home with a pie crust baked and ready to fill and a package of pudding to fill it with.  They were thrilled!  If they can do it, so can you. 

You can use your favorite pie crust recipe (if you have one.)  I get excited every time I teach someone how to roll a pie crust out between layers of plastic wrap.  You don't get flour all over the counter and clean up is easy!

Makes a single crust for 9 inch pie plate:

1 1/2 cup all purpose flour
½ cup butter flavored Crisco chilled
½ teaspoon salt
3 - 4 tablespoons cold water


"Fluff" flour in canister with large spoon or whisk before measuring flour.  (I don't think anyone sifts flour any more but I do suggest you do "fluff" your flour when making a pie.  It just takes a second.)
Put some ice cubes in some water, you want cold water.


In a large bowl combine 1 1/2 cup flour and 1/2 teaspoon salt.  Drop 1/2 cup chilled Crisco into flour.  I buy the Crisco Baking Sticks and keep them stored in the refrigerator.  I only use them for pies.  You can use regular Crisco but I would chill 1/2 cup before starting.


Cut Crisco with butter knife four or five times. 
 
 
With clean hands, pinch Crisco into flour.  You can use a pastry blender if you'd rather. 


Keep pinching till all the flour is mixed in.

 
Sprinkle one tablespoon of cold water over dough.  Toss with fork till the water is absorbed, do not over mix. 


Repeat till you have added 3 tablespoons water. 


Gently form dough into a ball.  If dough won't form a ball, sprinkle another tablespoon of water over dough.


Get your hand wet and dampened counter.  I know it's hard to see but I don't want you to forget this step, it keeps the plastic wrap from sliding around.  (I really wish I had nice, granite counter tops.)


Lay 2 pieces of plastic wrap over lapping in the center on dampened counter.  (Hard to take pictures.)


Place dough in middle of plastic wrap, flatten slightly. 


Place another sheet of plastic wrap over dough. 


Roll till crust is big enough to fit pie plate.  Roll gently from the center out to the edge.   To check that the crust will fit pie plate, place pie plate upside down on crust.  Crust should be one inch bigger  all the way around. 


If you need to you can take dough from one edge to add to another.


 Use plastic wrap to gently fold crust in half. 


Remove plastic wrap from top half. 


Gently lift crust into pie plate, with uncovered dough side down. 


Remove the other half of plastic wrap. 


Use the plastic wrap to help gently unfold crust. 


Fit crust to pie plate by lifting the edge of dough and lightly pressing dough into bottom edge of the sides of pie plate.  Do this all the way around the pie plate.  Remove second piece of plastic wrap.


Trim crust ¼ to ½ inch larger than pie plate.


Fold under edge.


Flute edge. 

If filling and crust are baked together use filling recipe for baking time and temperature. Such as a pumpkin pie.   If baking the crust empty prick bottom and sides well with fork.  Bake at 450 for 12 minutes or till lightly golden.   

Printer Friendly

ANN

Read more...

Sep 3, 2013

Italian Zucchini Quiche


I really like quiche, I think it's the combination of egg and pastry, that I enjoy.  We have made this recipe at the pie classes we teach and everyone has been surprised how much they like the quiche.  It's a great way to use zucchini.

Ingredients:

2 tablespoons butter
3-4 cups zucchini
3/4 cup chopped onion
1 tablespoon parsley or 2 tablespoons fresh parsley chopped
1/4 teaspoon basil or 3 leaves fresh basil chopped
1/4 teaspoon oregano
1/4 teaspoon garlic powder
3 eggs
1/4 teaspoon salt
1/8 teaspoon pepper
2 cups shredded mozzarella cheese
1 uncooked pie crust

Saute zucchini and onion in butter until tender.  Add parsley, basil, oregano, and garlic powder cook
an additional 2 minutes.  In bowl beat eggs with fork, add salt, pepper and cheese.  Combine egg and zucchini mixture.  Pour into 9 inch pie crust.  Bake at 375 for 25 minutes or until knife comes out clean.  Serve warm.  Top with thin slice of tomato when in season.

Printer Friendly

ANN

Read more...

Nov 25, 2012

Oreo Truffles!

It's Simply Sweet Sunday! I'm a traditional kind of girl,and I like to do my holidays in order.  I refuse to listen to Christmas music or put up my tree until after Thanksgiving.  But now that Thanksgiving is over it's time to be thinking about the most magical time of year, the Christmas season.  I LOVE this time of year for so many, many reasons and I'm not going to lie that one reason is because of all the sweets.  Seriously right around the holiday I justify eating dessert at breakfast, lunch and dinner.  These little treats are one of my all time favorites!  I've been making them for years and they're always a hit.


Oreo truffles are a delectable and rich sweet that will leave you mouth begging for one more!  One of the best parts is that they only have 3 ingredients.  The biggest downfall is that you have to dip each one which can take some time but believe me they are sooo worth the effort. So crank up the Christmas tunes and get dipping!
 
Here's what you'll need:
 
1 package of your favorite Oreos (I always go for mint!)
1 8 oz block of cream cheese
12 oz of melting chocolate (I usually use Almond Bark)
Wax paper


First, you have to smash your Oreos.  I use my chopper for this but you could put them in a ziploc bag and use a rolling pin as well.  
 
 
I like to get mine fairly fine.


I like to garnish my chocolates after dipping them and often I'll use some of the cookies crumbs to do so.  If you plan on doing this take a couple of tablespoons out now and put them in a separate bowl.  Next, mix in the block of cream cheese.  It helps if the cream cheese is soft and I use to a pastry blender or spoon for this.

 
Now, you're ready to form little chocolate balls.  I use a scoop for this but your hands work too.  The dough will be very sticky and I recommend putting the dough in the freezer for 15 to 20 minutes so they will be easier to dip.

 
While your dough is setting it's time to melt your chocolate.  Chocolate does burn fairly easily, so you need to keep the burner low and stir often.
 
Once your chocolate is smooth and creamy it's time to start dipping!  Professional chocolate dippers actually use their fingers for this but I prefer to use a fork or slotted spoon.


Once the truffles are covered in chocolate put them on wax paper to set.  If you are going to top them with anything now is the time.  Once the chocolate sets it won't be sticky enough to hold anything on.  Your options are limitless here.  Some of our favorites are candy pieces, cookie crumbs, sprinkles, white chocolate swirls, almost anything will work, so get creative!


They don't take too long to set, then you can either devour them or save them for your holiday event.  They do store well so you can prepare them 2 or 3 days before a party but do keep them in the fridge.  Here's to the sweetest time of year!

Enjoy!


JULIE

Read more...

Nov 11, 2012

Apple Dumplings


Simply Sweet Sunday

I just have to share this new (to me) recipe.  It so easy, and it's the season for apple desserts.   
Baking apples and cinnamon makes the whole house smell good.  Then wait till your family tastes it, they'll think you really went to a lot of work.  Sugar crusted pastry, sweet apple and cinnamon what more can you ask for?  Just some vanilla ice cream to go with it, right?

2 large Granny Smith apples
2 10 ounce cans of refrigerated crescent roll dough
1/2 cup butter
1 1/4 cup sugar
1 teaspoon cinnamon
1 12 ounce can citrus soda (not diet)

Grease a 9 x 13 pan.  Peel and core the apples, cut each apple into eight wedges.  Roll each apple wedge in a triangle of crescent dough, starting at the large end.


Press dough to cover apple and seal.


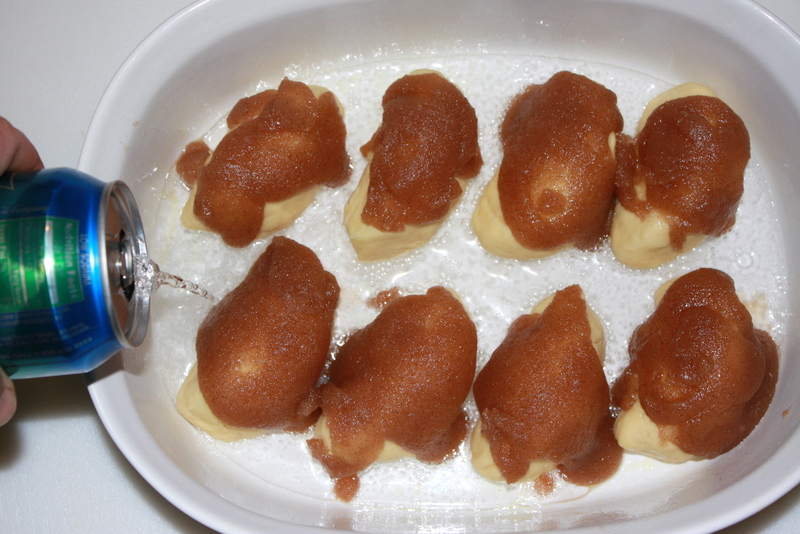
Place in baking dish.  Melt butter in a small sauce pan and stir in sugar and cinnamon.  (I used the microwave oven.)  Spoon over dumplings.  (I made half a recipe because there's just the two of us.)


Pour soda into pan, not washing off cinnamon and sugar mixture.


Bake at 350 for 40 - 45 minutes or until golden brown.


Let dumplings cool.  Serve warm with ice cream. 

Enjoy!    


ANN

Read more...

Nov 7, 2012

Cranberry Salsa!


I'm extremely excited to share this recipe today!  Every year as soon as Halloween is over I start scanning the produce section at the store and my heart always leaps a little when I see CRANBERRIES! I know what you're thinking "Cranberries, really?  This lady must be crazy!" But this recipe is why I get so excited.  I can't put it into words how amazingly delicious it is.  Honestly if you haven't tried it before it's going to knock your socks off!

Here's what you'll need:

1 12 oz bag of fresh cranberries
1 seeded jalabeno pepper
1 green onion
Fresh cilantro
3/4 cup sugar
1/4 tsp cumin
1 8oz block of cream cheese
Your favorite snack crackers


The instructions are simple.  Pretty much all you have to do is chopped everything up and mix it all together.  One important detail would be to make sure you seed your jalabeno pepper, oh and don't touch your eyes soon after. (As always I've learned the hard way.)

 I always start with my cranberries and I use my Pampered Chef food chopper to do so.  I also know people who use a food processor but make sure you don't over do it.  You do want it to be slightly chunky.  The chopping does take some time and effort but I promise the rewards are well worth it.  Then I seed and chop the jalabeno pepper and green onion.  Next I add the sugar and cumin.  For some reason I always save the cilantro for last, maybe because cilantro is my favorite.  Always use fresh and I use kitchen scissors to cut it up fairly well. 
Generously top the block of cream cheese with this goodness and then serve with your favorite snack crackers.

 Serve this a your next holiday party and you will be the hero of the hour!

Enjoy!


JULIE

Read more...
Related Posts Plugin for WordPress, Blogger...

  © Blogger template Coozie by Ourblogtemplates.com 2008 Customized and Installed by Custom Blog Designs

Back to TOP