Oct 22, 2013

Pumpkin Muffins


Simply Sweet Sunday  We like pumpkin desserts at our house.  Then add chocolate chips you can't go wrong.  On top of that say it's for breakfast.  It's like getting dessert for breakfast!  What I really use this recipe for the most is to take a treat to someone.  Every one likes them and it easy to give away part of a batch and still keep some for my family.  This makes everyone happy!

1/2 cup melted butter
2 large eggs
1 cup pumpkin
1 cup chocolate chips
1 2/3 cup flour
1 tablespoon pumpkin spice
1 teaspoon baking soda
1 cup sugar
1/2 teaspoon salt
1/4 teaspoon baking powder

In a large mixing bowl mix melted butter, eggs and pumpkin.  Stir in chocolate chips.  In a small mixing bowl combine dry ingredients together.  Mix dry ingredients into wet mixture.  Grease muffin tins.  Scoop into 18 muffin cups.  Bake at 350 for 20 minutes

Printer Friendly

Tip- Freeze the remaining pumpkin in 1 cup containers, it keeps for three months.  Use 2 to make Pumpkin Bars or 1 to make more muffins

ANN

Read more...

Sep 15, 2013

Pie Crust Recipe and Tips


Making a pie can be intimidating, but with a little practice you can do it!  One of my more crazy ideas was to teach the 12 and 13 year old girls in my church how to make a pie crust.  But I'm proud, and relieved to say it was a success!  Each girl went home with a pie crust baked and ready to fill and a package of pudding to fill it with.  They were thrilled!  If they can do it, so can you. 

You can use your favorite pie crust recipe (if you have one.)  I get excited every time I teach someone how to roll a pie crust out between layers of plastic wrap.  You don't get flour all over the counter and clean up is easy!

Makes a single crust for 9 inch pie plate:

1 1/2 cup all purpose flour
½ cup butter flavored Crisco chilled
½ teaspoon salt
3 - 4 tablespoons cold water


"Fluff" flour in canister with large spoon or whisk before measuring flour.  (I don't think anyone sifts flour any more but I do suggest you do "fluff" your flour when making a pie.  It just takes a second.)
Put some ice cubes in some water, you want cold water.


In a large bowl combine 1 1/2 cup flour and 1/2 teaspoon salt.  Drop 1/2 cup chilled Crisco into flour.  I buy the Crisco Baking Sticks and keep them stored in the refrigerator.  I only use them for pies.  You can use regular Crisco but I would chill 1/2 cup before starting.


Cut Crisco with butter knife four or five times. 
 
 
With clean hands, pinch Crisco into flour.  You can use a pastry blender if you'd rather. 


Keep pinching till all the flour is mixed in.

 
Sprinkle one tablespoon of cold water over dough.  Toss with fork till the water is absorbed, do not over mix. 


Repeat till you have added 3 tablespoons water. 


Gently form dough into a ball.  If dough won't form a ball, sprinkle another tablespoon of water over dough.


Get your hand wet and dampened counter.  I know it's hard to see but I don't want you to forget this step, it keeps the plastic wrap from sliding around.  (I really wish I had nice, granite counter tops.)


Lay 2 pieces of plastic wrap over lapping in the center on dampened counter.  (Hard to take pictures.)


Place dough in middle of plastic wrap, flatten slightly. 


Place another sheet of plastic wrap over dough. 


Roll till crust is big enough to fit pie plate.  Roll gently from the center out to the edge.   To check that the crust will fit pie plate, place pie plate upside down on crust.  Crust should be one inch bigger  all the way around. 


If you need to you can take dough from one edge to add to another.


 Use plastic wrap to gently fold crust in half. 


Remove plastic wrap from top half. 


Gently lift crust into pie plate, with uncovered dough side down. 


Remove the other half of plastic wrap. 


Use the plastic wrap to help gently unfold crust. 


Fit crust to pie plate by lifting the edge of dough and lightly pressing dough into bottom edge of the sides of pie plate.  Do this all the way around the pie plate.  Remove second piece of plastic wrap.


Trim crust ¼ to ½ inch larger than pie plate.


Fold under edge.


Flute edge. 

If filling and crust are baked together use filling recipe for baking time and temperature. Such as a pumpkin pie.   If baking the crust empty prick bottom and sides well with fork.  Bake at 450 for 12 minutes or till lightly golden.   

Printer Friendly

ANN

Read more...

Sep 6, 2013

Apple Galette

Simply Sweet Sunday


I so delight in a flaky crust, and an apple galette is just the way to show one off.  A flaky crust wrapped around sweet apples and cinnamon.  What more can your taste buds ask for?  With a galette you don't need a pie plate or fuss about how the edges look.

3-4 Golden Delicious apples peeled and sliced thinly (4 cups)
1 tablespoon lemon juice
1/4 cup sugar plus 1 tablespoon to sprinkle on top
1 tablespoon all-purpose flour
1 teaspoon cinnamon
1 tablespoon butter
1 tablespoon milk
1 tablespoon chopped walnuts or pecans (optional)
1 tablespoon apricot preserves melted (optional)
1 uncooked pie crust (recipe and tips here)

Combine apples with lemon juice in medium sized bowl, toss to coat apples.  In small bowl combine 1/4 cup sugar, flour and cinnamon.  Stir sugar mixture into apples.  On a dampened counter lay 2 pieces of plastic wrap over lapping in the center.  Place dough in middle of plastic wrap, flatten slightly.  Place another sheet of plastic wrap over dough.  Roll crust into a 12 x 14 circle.  Use plastic wrap to gently fold crust in half, remove plastic wrap from top half.  Lift crust onto ungreased baking sheet, with uncovered dough side down.  Remove the other half of plastic wrap.  Gently unfold crust.  Remove second piece of plastic wrap.  For pictures that show these steps but with a pie plate look here.  Heat oven to 400 degrease.  Mound apple filling onto the center of the crust, leaving 2 1/2 inch edge empty.  Dot apples with butter.  Sprinkle with nuts if using.


Fold uncovered crust up onto the apples, working around galette.  Brush top of pastry with milk.  Sprinkle with one tablespoon sugar.  With paper towel wipe off the milk and sugar that gets on baking sheet, because it will burn. 


Bake for 40 minutes or till crust is golden.  Brush top with melted apricot preserves if using.  Serve warm, we like vanilla ice cream with apple desserts. 
Enjoy every bite.

      
Printer Friendly

ANN

Read more...

Sep 3, 2013

Italian Zucchini Quiche


I really like quiche, I think it's the combination of egg and pastry, that I enjoy.  We have made this recipe at the pie classes we teach and everyone has been surprised how much they like the quiche.  It's a great way to use zucchini.

Ingredients:

2 tablespoons butter
3-4 cups zucchini
3/4 cup chopped onion
1 tablespoon parsley or 2 tablespoons fresh parsley chopped
1/4 teaspoon basil or 3 leaves fresh basil chopped
1/4 teaspoon oregano
1/4 teaspoon garlic powder
3 eggs
1/4 teaspoon salt
1/8 teaspoon pepper
2 cups shredded mozzarella cheese
1 uncooked pie crust

Saute zucchini and onion in butter until tender.  Add parsley, basil, oregano, and garlic powder cook
an additional 2 minutes.  In bowl beat eggs with fork, add salt, pepper and cheese.  Combine egg and zucchini mixture.  Pour into 9 inch pie crust.  Bake at 375 for 25 minutes or until knife comes out clean.  Serve warm.  Top with thin slice of tomato when in season.

Printer Friendly

ANN

Read more...

Mar 28, 2013

Dinosaur Eggs for Breakfast? April Fools!


A fun way to start the day on April 1st.  Peach halfs in "plops" of peach yogurt to look like eggs sunny side up.  Or for dessert use vanilla pudding instead of yogurt.

ANN

Read more...

Dec 7, 2012

Kids Say the Darndest Things!

It's finally FRIDAY!  It's been another crazy week at our house and I'm happy the weekend has arrived!

Did you know that on average a child laughs about 400 times a day?  FOUR HUNDRED!!! To me that's a lot, I guess that's because I'm a boring adult.  Can you guess how often adults laugh?  According to this study it's a whopping 17 times a day. And I know there are days that I don't meet that quota. This makes me wonder what has happened to us humorless adults.  Somewhere on our journey we have lost some of the most basic simple pleasures in life, like laughing.  Not only is laughing fun but it's also good for us. Laughter releases the chemical serotonin into our brains which makes us feels good.  It also reduces stress, relaxes us and helps us feel more comfortable in uncomfortable situations.  I don't understand all the science behind it but there are a few things I do understand; laughing makes me happy and my kids make me laugh a lot.  Having young kiddos around can often make things more stressful but also very comical.  My son Jaxson in particular is quite the character (full of his share of ups and downs!)  He's often saying or doing some of the funniest things, we've started calling them Jaxsonisms.  I thought for this week's Friday's Five Favorites I would share with you a few of the funny things this kid has said.  Just thinking everyone could use a good laugh!  Maybe we can pump that 17 up at least for today!


(I apologize in advance for some potty humor!)

1.  A few summers ago we were driving through a canyon when Jaxson loudly declared he had to go poop.  Luckily we were able to find an outhouse in a campground because we could not convince him to go in the grass.  He had no problem with an outhouse and made himself at home.  He actually found the whole adventure quite fascinating, bugs and smells included.  Jax was almost three at the time and because it was he first time in an outhouse I felt it was my motherly duty to be in there, holding onto him so he wouldn't fall in.  (Can you imagine if he had fallen in? Yuck!)  I on the other hand wasn't fascinated with the bugs and awful smells and was trying to get him to hurry the process along.  I kept asking him "Are you done?" over and over.  Each time he's calmly respond  "No" and keep talking about the bugs that were surrounding us.  I asked again and when he said no, I feeling a little exasperated exclaimed "You are a slow pooper!"  He looked up at me and said with a quizzical look "I am?"  "Yes, you are."  I quickly replied.  Finally, we were able to finish up and leave the amazing place and get back on the road.  Later that day while I was introducing Jaxson to someone new he interupted me and said matter-of-factly "Hi, I'm Jaxson and I'm a slow pooper."  It was one of those times that everyone couldn't help but laugh.  I wish I could say that was the only time he introduced himself as a slow pooper but alas, I can't.

       (Yes, he's eating toliet paper.  All I can say is thank goodness that stage is over!)

2.  While we are on the subject of introductions we also went through a spell just recently where Jaxson liked to introduce his whole family.  He loves talking to whomever will listen and would introduce us to everybody possible.  So, people at the park, church, library and grocery store would hear about his family.  Luckily my husband isn't usually with us on most outings but when he is get often gets an introduction similar to this; "and this is my dad, he toots a lot."  Keith always appreciates when he adds that in there.


3.  We'll get all the potty talk done with this one.  Potty training was quite the roller coaster ride with this kid, but we finally convinced him that wet or soggy pants aren't fun. One day at church Jaxson's teacher asked if anyone knew what one of the ten commandments was. Of course, Jaxson's hand shot up and when he was called on he matter-of-factly said "Never poop or pee in your pants." And in our house that's pretty much true.


4.  One day when Jax was about 4 we were eating lunch and out of the blue he stated "Mom, sometimes girls make me fall down." 

A little confused I asked "why is that?" 

He then lets about a big sigh with a very slight smile and a dreamy look "because they're soooo beautiful."

I think we might be in trouble with this young Casanova on our hands.


5. When Jaxson was 3 we were going through our house and dejunking.  We decided we'd sell online his little kid basketball hoop that we had kept in our basement.  We figured he rarely used it anymore and would probably not even notice that it was gone. The day after we sold it as soon as he went downstairs to play he immediately noticed and was not pleased.  It seemed to take hours to calm him down after I told him we sold it.  He was not happy with us!  The next day he asked for some grapes and unfortunately we had just ran out.  When I told them that the grapes were gone he stared at me with disbelief and even a little hurt in his eyes and finally said in a very pouty voice "What!  You sold my grapes too!"

He sure is a character and we wouldn't have him any other way! I hope you enjoy a giggle.  Have a great weekend!

JULIE

Read more...

Dec 5, 2012

The Smell of Christmas!

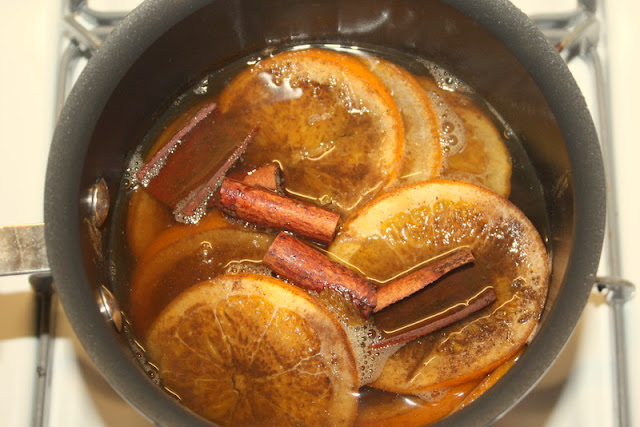
Christmas is in full swing at our house.  Every morning our son rushes into our room (too early I might add) asking if it's Christmas Eve.  Yes, we are getting excited for the big day.  Even our senses are enjoying the fresh changes that the season brings.  Our eyes are feasting on the beautiful lights and bright colors that decorate our home and our ears couldn't be happier to listen to the magical Christmas music all day.  Even our taste buds are getting their turn because we had our first taste eggnog tonight! And thanks to Pinterest our noses even get to enjoy the most wonderful time of the year.  While surfing my favorite site I found this interesting idea which really is an old an idea, of burning yummy concoctions on the stove just to make the house smell good.  A light bulb went off in my head "so, this is what they did before scented candles and Scentsy!"  I love the simplicity of it and my house does indeed smell like Christmas, without me baking!

You'll find lots of the different combinations all over the web but this one is our favorite and almost always on the stove.   All you need is some orange slices or peels (yes you can just use the peel), 3 or 4 cinnamon sticks and 2 to 3 teaspoons of ground cloves.


It can't be much easier that! Throw all of this goodness into a pot, cover with water and let it simmer.

You'll be surprised how quickly your house will smell good enough to eat!  The best part is that you can turn it on for a couple hours and then turn it off (especially when leaving the house) and then turn it back on.  It lasts for days!  Just use a pot you don't use very often and just let it sit out, you will have to occasionally add more water.  I am in LOVE with this smell of Christmas that fills our home so often now.  Enjoy!

JULIE

Read more...
Related Posts Plugin for WordPress, Blogger...

  © Blogger template Coozie by Ourblogtemplates.com 2008 Customized and Installed by Custom Blog Designs

Back to TOP