Mar 28, 2013

Dinosaur Eggs for Breakfast? April Fools!


A fun way to start the day on April 1st.  Peach halfs in "plops" of peach yogurt to look like eggs sunny side up.  Or for dessert use vanilla pudding instead of yogurt.

ANN

Read more...

Nov 7, 2012

Cranberry Salsa!


I'm extremely excited to share this recipe today!  Every year as soon as Halloween is over I start scanning the produce section at the store and my heart always leaps a little when I see CRANBERRIES! I know what you're thinking "Cranberries, really?  This lady must be crazy!" But this recipe is why I get so excited.  I can't put it into words how amazingly delicious it is.  Honestly if you haven't tried it before it's going to knock your socks off!

Here's what you'll need:

1 12 oz bag of fresh cranberries
1 seeded jalabeno pepper
1 green onion
Fresh cilantro
3/4 cup sugar
1/4 tsp cumin
1 8oz block of cream cheese
Your favorite snack crackers


The instructions are simple.  Pretty much all you have to do is chopped everything up and mix it all together.  One important detail would be to make sure you seed your jalabeno pepper, oh and don't touch your eyes soon after. (As always I've learned the hard way.)

 I always start with my cranberries and I use my Pampered Chef food chopper to do so.  I also know people who use a food processor but make sure you don't over do it.  You do want it to be slightly chunky.  The chopping does take some time and effort but I promise the rewards are well worth it.  Then I seed and chop the jalabeno pepper and green onion.  Next I add the sugar and cumin.  For some reason I always save the cilantro for last, maybe because cilantro is my favorite.  Always use fresh and I use kitchen scissors to cut it up fairly well. 
Generously top the block of cream cheese with this goodness and then serve with your favorite snack crackers.

 Serve this a your next holiday party and you will be the hero of the hour!

Enjoy!


JULIE

Read more...

Sep 20, 2012

Fabric Pumpkins, NO Sewing


These pumpkins are soooo easy.  Just use some fall fabric that matches you fall decor.  You only need half of yard or a fat quarter of fabric.  A half a yard will make two pumpkins.  Then grab a package of toilet paper, yes I said toilet paper.  Place the roll in the middle of your fabric.  Pull up the sides and push them in the hole of the toilet paper roll, and then do the corners.  Add a steam of a cinnamon stick, or cut a piece of a branch of a tree, or a roll of cardboard.  Add leaves cut from felt or paper, or from a silk plant.  Raffia bows would look good too.  The best thing is they're easy to make.  The second best part is they hardly take any space to store till next year, just take out the toilet paper and store the fabric, stem and leaves!

If you bought a 1/2 yard of fabric cut it in half to make two squares.  
(It doesn't need to be an exact square.)


Start with the shortest sides.


Then the other sides.
 
 
Now the corners.
 
 
Make a stem and leaves.  I used pieces of a branch, some leaves off of a silk ivy plant and vines made of florist wire wrapped with florist tape.  I wired them together with florist wire. 
 
 
This fabric was a thick flannel so I needed to trim the corners to get it to work. 


To make a more rounded bottom like the center and right pumpkin I put a large plastic lid under the roll of toilet paper.


ANN

Read more...

Jun 7, 2012

Make a flag from paint sticks!


I'm proud to live in our country, and I love our flag.  I get excited every year to put up my patriotic decorations.  To me they look summery so I have them out for most of the summer.  One of my favorites is this paint stick flag I made years ago when I was a cub scout leader.  The boys had fun and their flags looked good.  I would be so easy to make with your own children.

You need per flag:
7 paint sticks, these are 14 inch
wire, (I used door bell wire) 2 white are 18 inch, 1 red is 16 inch
16 stars, I made these with a dye-cut machine at a scrapbook store,  1 1/8 inch wide

You also will need:
paint: red, white and blue
foam paint brushes
wire cutters
drill
sand paper
masking tape
clear spray

Adult preparation:
Have one flag made for the boys to look at.
Use rubber bands to hold six paint sticks together.  Drill holes with 1/16 drill bit. 
Holes are 1/4 inch from edge, 3 1/2 inches from ends.
Make sure to drill straight so all the sticks will be the same. 
Drill the seventh paint stick with holes only at the top.  This will be the bottom stripe.  Lightly with a red pencil write red on this paint stick. 


Sand with sand paper any ruff wood left from drilling holes.
Use masking tape to make a line to paint blue on 4 paint sticks.  6 1/2 inchs of blue.


Instruct boys to not use too much paint so it will dry faster.
Paint the blue on the 4 taped sticks, allow to dry.


While the blue dries paint 2 sticks all red.  One must be the one with red written on it.
Paint 1 paint stick all white.
Take tape off of the sticks painted blue.
Put tape over the blue to make line to paint the other half  red or white.


Paint 2 of the half blue sticks red.
Paint 2 of the half blue sticks white.

Make a knot in one end of the white wires.
Lay out the seven paint sticks to look like a flag.
Start with the red stick with only the top holes. Bring wire through hole from the bottom.  Stitch the stripes together. 
Wrap excess wire around pencil to make spirals. 
Use red wire to make a hanger.
Glue on stars, let me make their own pattern if they want.
Spray with clear spray

 
ANN

Read more...

Apr 2, 2012

Jelly Bean Nest Cookies

My sister-in-law makes these yummy, cute cookies every year for our extended family Easter egg hunt.  She is a wonderful aunt to make these every year for her nieces and nephews!


1 cup butter or margarine
8 oz. cream cheese
2 cups sugar
1 egg
1 teaspoon vanilla
1/4 teaspoon coconut extract
1/4 teaspoon almond extract
1 teaspoon baking powder
3 1/2 cups flour

small jelly beans (Starburst Jelly Bean or Jelly Belly size)
flaked coconut (tinted green)
green food color

To tint coconut green, place coconut in a plastic bag with several drops of green food color and  shake to coat.

Beat together margarine and cream cheese.  Add sugar, egg, vanilla, coconut and almond extracts.  Mix till creamy.  Add baking powder and flour, add flour one cup at a time beating well after each addition.  Roll the dough into small balls.  Bake at 350 degrees for 12 minutes. Cookies will not brown on top and remain a creamy white color.  Remove from the oven and immediately scoop the top out of each cookie.  Fill the top of each cookie with tinted coconut to make a nest.  Place 3 jelly beans on top.

Note: To use this recipe when it is not Easter time, omit coconut and jelly beans and stir in 12 oz. package of chocolate chips into the dough.
Printer Friendly

ANN

Read more...

Mar 31, 2012

Chocolate, Coconut Easter Nests

Russell Stover Nests have been a part of our family Easter egg hunts for as long as I can remember.
It's easy to make them at home.

12 oz package coconut flakes (toasted)
1 pound milk chocolate
small jelly beans (Starburst jelly beans and Jelly Belly size)

1.  To toast coconut preheat oven to 300.  Spread coconut out on a 10 x 15 cookie sheet.

Bake for 10 minutes, stir coconut.  Bake for 5 minutes more stir coconut again.  Repeat till coconut is turning golden, remove from oven when most of the coconut is golden but some is still white.  My took a total of 25 minutes but ovens very.  Watch closely once it is starting to toast. 


2.  To melt chocolate a lot of people use a micro wave oven.  Be careful using a micro wave oven, if chocolate gets too hot it is ruined.  I like to use the double boiler method.  I put a glass bowl over simmering water.  The water shouldn't touch the bowl.  Stir till chocolate is melted.


3.  Stir coconut into the chocolate, you might not need all the coconut so don't dump it all in.  I would leave out about 1 cup of the coconut.  Let cool for just a minute or two or the scoops won't hold together.  I used a 2 tablespoon scoop.  I flatten the scoops with the side of the scooper.  Put three jelly beans in as you go, they won't stay if the chocolate sets.  Makes 30 nests.


Enjoy your nests!

ANN


Read more...

Mar 22, 2012

Celebration Banner

This is a fun birthday tradition to start, hanging a birthday banner.  Here are some pictures of ones I've made.  You could make a gender neutral one to use for all your family's birthdays.  Julie wanted one for her son and one for her daughter.


You can even it make it more personalized by making their name as well.


I made these with 5 inch letters.  The rectangles are 5 1/2 x 7 inches.  The felt behind is 6 x 9 inches, folded to make a casing to thread a rope through.  They are made with fabric but can be made with little or no sewing.  To figure how much fabric you'll need, this information should help.  You will want to use woven cotton or cotton blend fabrics and felt for the back.  There is no need to preshrink or pre-wash the fabric because you won't be washing your banner.

  • 1/4 yard for the letters
  • 1/2 yard wonder under (I've used 805 and 725) this is paper-backed fusible web to fuse the letters on
  • 1/4 yard for each print for the background (if the fabric is 45 inches wide, you can get 7 rectangles)
  • You'll need 3 or 4 backgrounds
  • 1 yard of iron-on pellon interfacing, this goes on the back of the background to keep it from fraying and adds stiffness           
  • 2/3 yard felt, if the felt is 72 inches wide
  • Thread to match the felt if you are sewing, hot glue if not
Other items you'll need:
  • Patterns for 5 inch letters (I found my at a teacher's supply store)
  • 20 feet thin rope or twine (not yarn it stretches)
  • Ruler or/and yard stick
  • Sewing pins
  • Large safety pin or large bobby pin
Print supply list

These pictures where taken while making a Halloween Banner, the steps would be the same for a Birthday banner.  You can make a banner for any occasion.  You could make a child's name to hang in their room or your family name to hang in a family room.  I suggest you read all the way though the post before you start.  Banners are fun to make and anyone can do it!

Step One, The Letters:
Iron the fabric for the letters.  It will be easier if there are no wrinkles in the fabric.
Following the directions that come with the wonder under iron it onto the back of the fabric for the letters.  The paper side up to the iron, the fabric is wrong side to wonder under.

Trace the letters you'll need onto the wonder under, the paper side.  I use a pencil.  Letters need to be backwards so when you turn them over they'll be right. 


Cut the letters out.

Step Two, Back Ground Rectangles:
Iron the fabrics for the background.
Cut the iron-on interfacing into 5 strips. 4 will be 7 1/2 inches wide.  1 will be 6 inches wide.
Following the directions that come with the iron-on interfacing, iron one of the 7 1/2 inch strips onto the back of each of the background fabrics. 

If you chose 4 backgrounds, you cut 3 rectangles from each strip. If you chose three, cut the 4th 7 1/2 piece of interfacing into thirds. Iron a third onto each of the backgrounds so that you get 4 rectangles from each background. You need one more but wait until after you lay them out.

Cut each strip into 5 ½ x 7 inch rectangles.  This can be done using a rotary cutter and cutting mat. 


If you don’t have a rotary cutter you can make a 5 1/2  x7 pattern out of card stock or a file folder. Then trace the pattern onto the interfacing side of the strip and cut out with scissors. 


Next lay out your rectangles with the letters on them.  Decide the order of the backgrounds.


Now you know which background you need one more of.  Cut 8 inches off the 6 inch strip of interfacing, iron it onto the background fabric.  Cut one more 5 1/2 x7 inch rectangle.

Peel the paper backing off of a letter.


Position it where you want it on the rectangle.  You can eye ball it, or measure it so that the letters are the same distance from the bottom and centered.   

Following the directions from the wonder under press the letter on the rectangle.  This is a perfect time to make sure the edges of the background fabric is glued to interfacing by pressing edges.  Repeat with all of the letters.


Step three, felt backing:
Cut 13 rectangles 6 x 9 inches.  This can be done with a rotary cutter and cutting mat.  If you don't have a rotary cutter make a 6 x 9 inches pattern from newspaper.  Pin the pattern on the felt and cut around the pattern.

To make the casing for the rope, fold the top down 1 inch and pin.


If you have a sewing machine, stitch 3/4 inch from top.  Make sure to back stitch at each end.  If you don't like to sew or haven't had much experience don't worry, the stitching doesn't show.


It is much easier to sew the casing but it can be hot glued.  If you use hot glue to glue casing you will have to glue the letter rectangle to the felt in the next step, you can't sew through hot glue.  To hot glue use pins to make a line 3/4 inch from top of fold. 

Lift the 1/4 inch edge and run hot glue between edge and rectangle, press together (using your fingers, not an iron).  Quickly remove pins.

Step Four, Putting it all together:
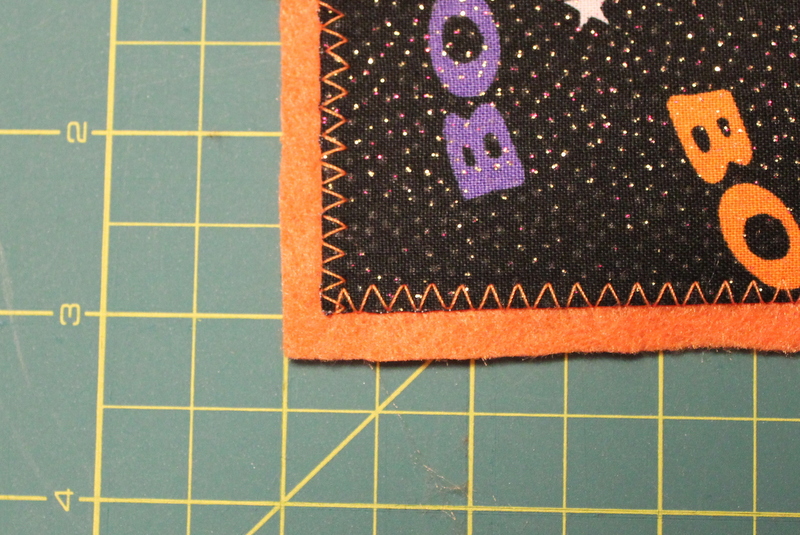
Place a letter rectangle on a felt rectangle, 1/4 inch from the bottom.  Pin in place.  It will cover the stitching for the casing.


Sew around the letter rectangle using a zig-zag or hem stitch.  I use a hem stitch.  While sewing, when you get to the corner leave the needle down in the fabric and lift presser foot to turn fabric.
Then let presser foot back down and continue sewing.  Repeat with remaining letters.


Or you can hot glue the letter rectangle onto the felt.  You might want to use some scraps of the background fabric with the interfacing ironed on to check that the glue doesn't show through.
If it does (and you can't sew) use Unique Stitch, found at fabric stores.
Before gluing, pin in place by putting one pin in the middle and one near the top in the center.
To glue, lift bottom half and put glue around the edge.  Not too close, glue will spread.  Press down.  When glue is set, remove pins and glue top half.

The last step is to thread the rope through the casings.  To do this lay out the letters in order, you can start at either end of a word.  Loop the rope though a large safety pin.  Use tape to keep the loop in the rope.  The pin is so you have something stiff to push though casing.

Leave plenty of rope at the ends.  This will make it a lot easier to hang and tie knots.  I put each word on it's own rope.  If you have a large place to hang the banner you can use one rope.  Make knots in the rope to make a space between the words.  Be sure to tie the knots before putting the second word on the rope.  Now hang your banner.  Enjoy!


This post has been linked on Ginger Snap Crafts!


ANN

Read more...
Related Posts Plugin for WordPress, Blogger...

  © Blogger template Coozie by Ourblogtemplates.com 2008 Customized and Installed by Custom Blog Designs

Back to TOP